How to Set Up Google Analytics (GA4) on Your Website

If you’re searching for how to install Google Analytics on a website, the process is easier than it might seem. Google Analytics 4 (GA4) lets you see where visitors come from, which pages they visit, how they interact with your content, and what actions they take.
That information can be useful for SEO, content marketing, and general website management. Instead of looking at traffic numbers alone, you can use GA4 to understand what’s working and where your website could do better.
The good news is that you don’t need to be a developer to get started. In this guide, we’ll walk through how to install Google Analytics on a website, from creating your GA4 property to adding the tracking code to WordPress and basic HTML sites.
What Is Google Analytics?
Google Analytics is Google’s analytics platform for collecting and reporting data from websites and apps.
Once Google Analytics is connected to a website, it can collect information about how people interact with the site. The data can then be used to understand traffic, engagement, conversions, and other aspects of website performance.
GA4 can track a wide range of metrics and events, including:
- Users
- Sessions
- Pageviews
- Engagement rate
- Bounce rate
- Average engagement time
- Conversions or key events
- Event counts
- Revenue
- Traffic sources
The interesting part is that the data isn’t just useful for looking at how much traffic a website receives. It can also help answer more practical questions.
Which pages attract visitors? Where are users coming from? Are people actually engaging with the content? Which traffic sources bring visitors who take meaningful actions?
That’s where GA4 becomes useful for SEO and digital marketing.
Before Installing Google Analytics
You’ll need a Google Account to create and manage a Google Analytics property.
If you already use Gmail or another Google service, you can generally use that existing account. If you don’t have one yet, create a Google Account before starting the GA4 setup.
Once that’s ready, head to Google Analytics.
How to Create a Google Analytics Account
If you’re setting up Google Analytics for the first time, you’ll need to create an Analytics account before adding your website.
The basic process is:
- Open Google Analytics.
- Select Start Measuring if you’re a new user.
- Open Admin using the gear icon.
- Select Create, then choose Account.
- Enter your account name.
- Review the available data-sharing settings and select the options that suit you.
- Click Next to continue.
Your Analytics account acts as the container for your properties. If you manage multiple websites or businesses, keeping that structure organized from the beginning can save you headaches later.
Also Read: What You Need Before Adding Google Analytics
Create a GA4 Property
After creating the account, Google Analytics will ask you to create your first property.
A property generally represents the website or app whose data you want to measure.
Enter the following information:
- Property name — for example, your business or website name.
- Reporting time zone — choose the time zone you want to use for your reports.
- Currency — select the currency relevant to your business.
Click Next.
Google will then ask for some additional information, including your industry category and business size. You’ll also be asked about how you intend to use Google Analytics.
Complete the relevant options and continue to create the property.
If this is your first time setting up Analytics, you’ll also need to accept the applicable Analytics Terms of Service and Data Processing Amendment.
Once the property has been created, you’re ready to connect your website.
Add a Web Data Stream
GA4 uses data streams to collect information from websites and apps.
For a website, you’ll want to create a Web data stream.
Also Read: 8 AI Detection Tools Recommended by Ahrefs
Choose:
Add a data stream → Web
Enter your website URL and give the stream a recognizable name.
For example:
- Website URL:
namabisnisku.com - Stream name:
Nama Bisnis Ku Website
You may also see the Enhanced Measurement option.
This feature can automatically collect certain interactions, such as page views and other events, without requiring you to manually configure every event from scratch.
Review the setting and enable it if it makes sense for your tracking needs.
Then click Create stream.
Your web data stream is now ready.
How to Get the GA4 Tracking Code
Creating the property isn’t enough. Your website still needs a Google tag so GA4 can receive data.
From your Google Analytics property:
- Open Admin.
- Go to Data collection and modification.
- Select Data streams.
- Click your website’s web data stream.
- Find View tag instructions.
- Open the instructions.
- Select Install manually.
- Copy the Google tag code provided by Google.
You’ll see a JavaScript snippet containing the Google tag, typically placed within the <head> section of your website.
That’s the code that connects your website with your GA4 property.
Now comes the part that matters: installing it correctly.
How to Install Google Analytics on WordPress
There are several ways to add the Google tag to a WordPress website. One straightforward option is using a plugin.
Install GA4 With WPCode
For this example, you can use the WPCode plugin to insert the tracking code into your site’s header.
After installing and activating WPCode:
- Open Code Snippets in your WordPress dashboard.
- Select Header & Footer.
- Paste the Google Analytics code into the Header section.
- Save the changes.
That’s it.
The advantage of using a plugin is that you don’t have to edit your theme files directly. This can also make the setup easier for users who aren’t comfortable working with PHP or WordPress theme code.
After adding the code, return to Google Analytics and use the Test installation option under the manual installation instructions to verify that everything is working.
Install GA4 Without a Plugin
If you’d rather avoid another WordPress plugin, you can also add the tracking code directly to your theme.
From the WordPress dashboard:
- Go to Appearance → Theme Editor.
- Open the theme’s
header.phpfile. - Locate the closing
</head>tag. - Paste the Google Analytics code immediately before it.
- Save the changes.
Afterward, use Test installation in Google Analytics to check the connection.
One thing to keep in mind: directly modifying a theme file can create maintenance issues when the theme is updated. If you’re using this approach, make sure you understand how your WordPress theme handles custom changes.
How to Install Google Analytics on an HTML Website
Running a website without WordPress? That’s fine. GA4 can also be installed manually on a traditional HTML website.
You’ll need access to your website’s files, either through your hosting control panel, file manager, FTP client, or another method provided by your hosting company.
Find the HTML file you want to track.
For many basic websites, this might be:
index.html
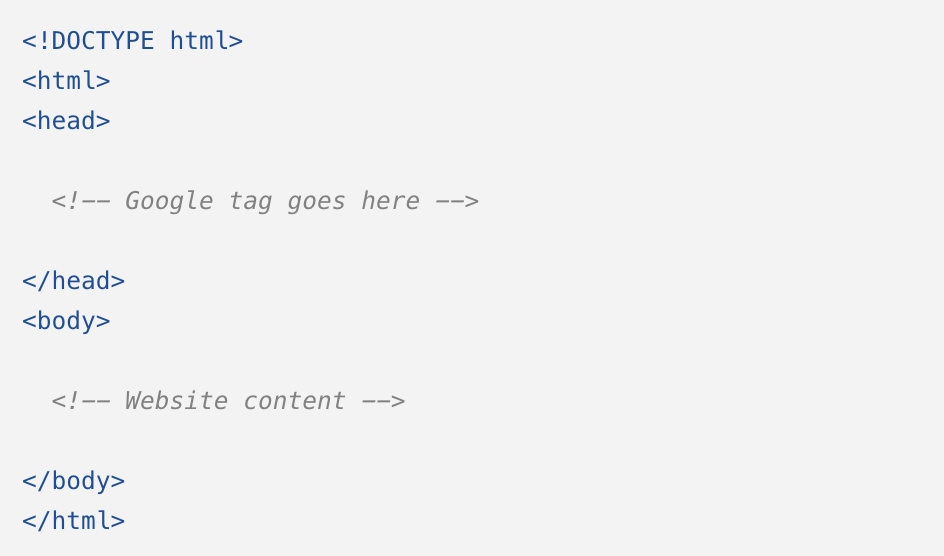
Open the file and locate the <head> section.
Paste the Google Analytics tag inside the <head> section, then save the file.
A simplified structure will look like this:
Tagged with:
Google Analytics
An SEO Specialist & PR Strategist with over 6 years of experience in outreach guest posting, link building, and content marketing. Focused on building brand awareness through measurable digital marketing strategies. With a background in journalism and a wide professional network.





One thought on “How to Set Up Google Analytics (GA4) on Your Website”